31 Mart 2021 Çarşamba

SpringWebFlux @WebFluxTest Anotasyonu


@WebFluxTest Anotasyonu
Örnek
Şöyle yaparız
@WebFluxTest(controllers = {RateRestController.class})
@Tag("UnitTest")
public class RateRestControllerTest {

  @MockBean
  private RateService rateService;
  
  @Autowired
  WebTestClient webTestClient;
  
  @Test
  public void getLatestRates() throws Exception {

    // Mock return data of rate service
    when(rateService.fetchLatestRates(anyString()))    
    .thenAnswer(invocation -> {
      String baseCurrency = (String) invocation.getArgument(0);
      LocalDateTime timestamp = LocalDateTime.now();
      return Flux.just(
          new Rate(timestamp, baseCurrency, "USD", Math.random()),
          new Rate(timestamp, baseCurrency, "EUR", Math.random()),
          new Rate(timestamp, baseCurrency, "CAD", Math.random()),
          new Rate(timestamp, baseCurrency, "JPY", Math.random())
          );
    });
    
    // trigger API request to rate controller
    webTestClient.get()
    .uri("/rates/latest/GBP")
    .accept(MediaType.APPLICATION_JSON)
    .exchange()
    .expectStatus().isOk()
    .expectBody()
    .jsonPath("$").isArray()
    .jsonPath("$[0].baseCurrency").isEqualTo("GBP")
    .jsonPath("$[0].counterCurrency").isEqualTo("USD")
    .jsonPath("$[0].rate").isNumber()
    .jsonPath("$[1].baseCurrency").isEqualTo("GBP")
    .jsonPath("$[1].counterCurrency").isEqualTo("EUR")
    .jsonPath("$[1].rate").isNumber()
    .jsonPath("$[2].baseCurrency").isEqualTo("GBP")
    .jsonPath("$[2].counterCurrency").isEqualTo("CAD")
    .jsonPath("$[2].rate").isNumber()
    .jsonPath("$[3].baseCurrency").isEqualTo("GBP")
    .jsonPath("$[3].counterCurrency").isEqualTo("JPY")
    .jsonPath("$[3].rate").isNumber();    
  }
}

29 Mart 2021 Pazartesi

SpringContext Internationalization MessageSource Arayüzü

Giriş
Şu satırı dahil ederiz
import org.springframework.context.MessageSource;
Gösterilecek metinleri yükleyen arayüz. Açıklaması şöyle
MessageSource is an interface that defines several methods for resolving messages. The ApplicationContext interface extends this interface so that all application contexts are able to resolve text messages.
Bu arayüzü gerçekleştiren iki tane sınıf var. Bunlar ResourceBundleMessageSource ve ReloadableResourceBundleMessageSource.

Açıklaması şöyle
Spring Boot has i18n built-in thanks to the Spring Framework and its MessageSource implementations. There’s a ResourceBundleMessageSource that builds on ResourceBundle, as well as a ReloadableResourceBundleMessageSource that should be self-explanatory.

Inject MessageSource into a Spring bean and call getMessage(key, args, locale) to your heart’s content!

SpringKafka Consumer ConcurrentKafkaListenerContainerFactory.setErrorHandler() metodu

Giriş
Hataları ele almak için seçeneklerimiz şöyle
When you build your spring boot application and make use of Kafka in order to create some consumer, Spring provides on its own a listener container for asynchronous execution of POJO listeners. The provided listener container has three ways to handle a potential exception:

1. Ignores it and moves to the next record.
2. It can retry to process the same item from the listed topics/partitions of that listener.
3. It can send the item to a dead letter topic.
Açıklaması şöyle. Yani eğer bir şey yapmazsak varsayılan davranış hatalar dikkate almamak
By default, records that fail are simply logged, and we move on to the next one. We can, however, configure an error handler in the listener container to perform some other action. 
Retry
Retry için iki seçenek var
1. Kafka Client Kütüphanesini kullanmak. Bu yöntem stateless retry olarak anılıyor.
2. Spring sınıflarını kullanmak. Bu yöntem stateful retry olarak anılıyor.

setErrorHandler metodu - Stateful Retry İçindir
SeekToCurrentErrorHandler kullanılabilir.


setRetryTemplate metodu - Stateless Retry İçindir
Açıklaması şöyle
The Java Kafka client library offers stateless retry, with the Kafka consumer retrying a retryable exception as part of the consumer poll.
- Retries happen within the consumer poll for the batch.
- Consumer poll must complete before poll timeout, containing all retries, and total processing time (including REST calls & DB calls), retry delay and backoff, for all records in the batch.
- Default poll time is 5 minutes for 500 records in the batch. This only averages to 600ms per event.
- If poll time is exceeded this results in event duplication.
- Calculation of retries/time possible, but total retry duration will have to be short.
Örnek
Şöyle yaparız
import org.springframework.kafka.config.ConcurrentKafkaListenerContainerFactory;
import org.springframework.retry.support.RetryTemplate;

//Stateless retry listener.
@Bean
public ConcurrentKafkaListenerContainerFactory<String, String>
  kafkaStatelessRetryListenerContainerFactory(
    ConsumerFactory<String, String> consumerFactory, final RetryTemplate retryTemplate) {

  ConcurrentKafkaListenerContainerFactory<String, String> factory =
    new ConcurrentKafkaListenerContainerFactory();
  factory.setConsumerFactory(consumerFactory);
  factory.setRetryTemplate(retryTemplate);
  factory.setRecoveryCallback((context -> {
    log.warn("**** Retries exhausted - error class: "+context.getLastThrowable() +
             " - error message: "+context.getLastThrowable().getMessage());
      // Return null to mark processing complete.
      return null;
  }));
  return factory;
}

@Bean
public RetryTemplate retryTemplate() {
  return RetryTemplate.builder()
    .fixedBackoff(4000)
    .maxAttempts(5)
    .build();
}

23 Mart 2021 Salı

SpringBoot spring.jpa Hibernate'e Özel Ayarlar - Hibernate Naming Strategies

Giriş
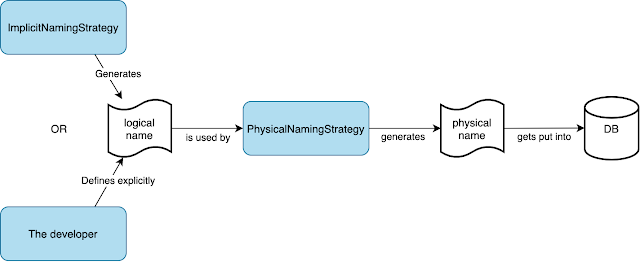
İki tane naming strategy var. Bunlar ImplicitNamingStrategy ve PhysicalNamingStrategy. Eğer nesnemize bir isim vermediysek, ImplicitNamingStrategy devreye girer ve bir isim üretir. Ancak bu isim veri tabanındaki isim değildir. Hibernate tarafından kullanılan mnatıksa bir isimdir. Bu ismi gerçek veri tabanına dönüştüren şey ise PhysicalNamingStrategy.

Yani şeklen şöyle


Hibernate Açısından Arayüzlerin Açıklaması
Açıklaması şöyle
According to the documentation, there are two interfaces responsible for naming your tables, columns etc. in Hibernate: ImplicitNamingStrategy and PhysicalNamingStrategy.
Aslında bunlar arayüz oldukları için gerçekte kullanılan sınıflar ImplicitNamingStrategyJpaCompliantImpl ve PhysicalNamingStrategyStandardImpl.

Bir de ImplicitNamingStrategyLegacyJpaImpl var. Ancak bu JPA 1.0 için kullanılıyordu.

1. ImplicitNamingStrategy 
Açıklaması şöyle. Eğer bir nesneye isim vermezsek bu arayüz devreye girer ve bir isim üretir.
ImplicitNamingStrategy is in charge of naming all objects that were not explicitly named by a developer: e.g. entity name, table name, column name, index, FK etc. The resulting name is called the logical name, it is used internally by Hibernate to identify an object. It is not the name that gets put into the DB.
Örnek
Şöyle yaparız.
spring.jpa.hibernate.naming.physical-strategy=
  org.hibernate.boot.model.naming.PhysicalNamingStrategyStandardImpl
Örnek
Şöyle yaparız
spring:
 jpa:
  hibernate:
   naming:
    physical-strategy: org.hibernate.boot.model.naming.PhysicalNamingStrategyStandardImpl
    implicit-strategy: org.hibernate.boot.model.naming.ImplicitNamingStrategyLegacyJpaImpl
2. PhysicalNamingStrategy
Açıklaması şöyle
PhysicalNamingStrategy provides the actual physical name used in the DB based on the logical JPA object name. Effectively, this means that using Hibernate you cannot specify database object names directly, but only logical ones.
Bu aslında şu anlama geliyor
Effectively, this means that using Hibernate you cannot specify database object names directly, but only logical ones.

Spring Açısından Arayüzlerin Açıklaması
Ancak Spring, Hibernate tarafından sağlanan arayüzlere kendi sınıflarını takıyor. Açıklaması şöyle.
Spring Boot overrides Hibernate default implementations for both interfaces and uses SpringImplicitNamingStrategy and SpringPhysicalNamingStrategy instead.
1. SpringImplicitNamingStrategy
Açıklaması şöyle.
Effectively, SpringImplicitNamingStrategy copies the behaviour of ImplicitNamingStrategyJpaCompliantImpl with only a minor difference in join table naming. 
...
By default, Spring Boot configures the physical naming strategy with SpringPhysicalNamingStrategy. This implementation provides the same table structure as Hibernate 4: all dots are replaced by underscores and camel casing is replaced by underscores as well. Additionally, by default, all table names are generated in lower case. For example, a TelephoneNumber entity is mapped to the telephone_number table.
...
Basically, it always transforms camelCase and PascalCase to snake_case. In fact, using it isn't possible to work with non_snake_case at all. 
Açıklaması şöyle.
By default, Spring Boot configures the physical naming strategy with SpringPhysicalNamingStrategy. Which does this: For example, a TelephoneNumber entity is mapped to the telephone_number table (same goes for columns).
Burada Spring JPA standardından sapıyor ve isimleri snake_case olarak üretiyor. Açıklaması şöyle
The JPA default table name is the name of the class (minus the package) with the first letter capitalized. 
2. SpringPhysicalNamingStrategy
@Table(name = "PetType") versek bile veri tabanında pet_type isimli tablo oluşur
@Table(name = "\"PetType\"")  versek bile veri tabanında "pet_type" isimli tablo oluşur
Eğer kendi nesnemizi takmak istersek şöyle yaparız.
public class UpperCaseNamingStrategy extends SpringPhysicalNamingStrategy {
  @Override
  protected Identifier getIdentifier(String name, boolean quoted,
JdbcEnvironment jdbcEnvironment) {
    return new Identifier(name.toUpperCase(), quoted);
  }
}
Kullanmak için şöyle yaparız.
spring.jpa.hibernate.naming.physical-strategy=
com.baeldung.namingstrategy.UpperCaseNamingStrategy

10 Mart 2021 Çarşamba

SpringWebFlux Security

Giriş
Şu satırı dahil ederiz
import org.springframework.security.config.annotation.web.reactive.EnableWebFluxSecurity;
Örnek
Şöyle yaparız
@EnableWebFluxSecurity
public class HelloWebFluxSecurityConfig {
  @Bean
  public MapReactiveUserDetailsService userDetailsService() {
    UserDetails user = User.withDefaultPasswordEncoder()
      .username("user")
      .password("user")
      .roles("USER")
      .build();
    return new MapReactiveUserDetailsService(user);
  }
}
Örnek
Şöyle yaparız
@Component
public class AuthenticationManager implements ReactiveAuthenticationManager {

  @Autowired
  private JWTUtil jwtUtil;

  @Override
  public Mono<Authentication> authenticate(Authentication authentication) {

    String authToken = authentication.getCredentials().toString();
    return Mono.just(authToken)
               .map(token -> jwtUtil.validateToken(token))
               .onErrorResume(e -> Mono.empty())
               .flatMap(isValid -> jwtUtil.getAllClaimsFromToken(authToken))
               .map(claims -> new UsernamePasswordAuthenticationToken(
                 claims.getSubject(), 
                 null, 
                 Collections.singletonList(new SimpleGrantedAuthority(
                   claims.get(KEY_ROLE).toString()))));
    }
}


4 Mart 2021 Perşembe

SpringCache Kullanımı

Giriş
Kısaca 
1. @EnableCaching ile cache etkinleştirilir
2. Bir CacheManager Arayüzü tanımlanır
3. @Cacheable select, find metodları için kullanılır
4. @CachePut update metodları için kullanılır
5. @CacheEvict delete metodları için kullanılır
6. @Caching metod üzerinde birden fazla aynı cache anotasyonunu kullanmak birden fazla defa kullanmak istiyorsak bunları birleştirmek için kullanılır. Çünkü Java aynı anotasyonunu iki defa eklenmesine izin vermez. Örneğin bir metod çağrısında iki farklı cahce'ten bir şey silmek istiyorsak işe yarar
7. @CacheConfig sınıf üzerine yazılır. Sınıfta kullanılan tüm cache anotasyonlarına ortak özellikler verir

Bir başka açıklama şöyle
@Cacheable : Triggers cache population
@CachePut : Updates the cache, without interfering with the method execution
@CacheEvict : Triggers cache eviction[removing items from cache]
@Caching : Regroups multiple cache operations to be applied on a method
@CacheConfig : Shares some common cache-related settings at class-level
@EnableCaching : Configuration level annotation, enables Caching
Desteklenen Cache Sağlayıcıları
Açıklaması şöyle
The following are the cache provider supported by Spring Boot framework :

1. JCache (JSR-107)
2. EhCache
3. Hazelcast
4. Infinispan
5. Couchbase
6. Redis
7. Caffeine
8. Simple


SpringCache Redis Kullanımı

Giriş
Açıklaması şöyle
The RedisCacheManager is automatically configured when we configure Redis. The default configuration is set by using property spring.cache.redis.*.

Maven
Şu satırı dahil ederiz
dependency>
  <groupId>org.springframework.boot</groupId>
  <artifactId>spring-boot-starter-data-redis</artifactId>
</dependency>
<dependency>
  <groupId>redis.clients</groupId>
  <artifactId>jedis</artifactId>
</dependency>
Gradle
Şu satırı dahil ederiz
dependencies {
 ...
 implementation 'org.springframework.boot:spring-boot-starter-cache'
 implementation 'org.springframework.boot:spring-boot-starter-data-redis'
 ...
}

application.properties Ayarları

3 Mart 2021 Çarşamba

SpringCloud Netflix Hystrix Kullanımı - Circuit Breaker İçindir - Kullanmayın

Giriş
Açıklaması şöyle
Hystrix is a fault tolerance java library. This tool is designed to separate points of access to remote services, systems, and 3rd-party libraries in a distributed environment like Microservices. It improves overall system by isolating the failing services and preventing the cascading effect of failures.
Açıklaması şöyle.
If you are using Spring cloud for communication between microservices, you may leverage Spring Cloud Netflix Hystrix or Spring Cloud Circuit Breaker to implement circuit breaking. However, the first solution has been already moved to the maintenance mode by the Pivotal team, since Netflix does not develop Hystrix anymore. The recommended solution is the new Spring Cloud Circuit Breaker built on top of the resilience4j project.
Maven
Şu satırı dahil ederiz
<dependency>
  <groupId>org.springframework.cloud</groupId>
  <artifactId>spring-cloud-starter-netflix-hystrix</artifactId>
  <version>2.2.2.RELEASE</version>
</dependency>
İki tane önemli anotasyon var.
1. @EnableHystrix

SpringCloud Stream Processor Bean

Giriş
Açıklaması şöyle
Processors can forward the incoming messages towards output channels after processing it.
Açıklaması şöyle
The processor’s return type is the Function interface which has two generic parameters. The first one is the input data (reactive stream in our case) and the second one is the output. 
Spring otomatik olarak processor method ismi-in + index ve method ismi-out + index şeklinde bir topic oluşturur ve processor bu "in" topic'i dinleyip çıktısını "out" topic'e yazmaya başlar. 

Ancak bazen kullanmak istenilen topic ismi farklı olabilir. Bu durumda application.properties dosyasında 
dinlenecek topic myprocessor-in-0 altındaki destination alanında dinlemek istediğimiz topic belirtilir.
yazılacak topic ise myprocessor-out-0 altındaki destination alanında dinlemek istediğimiz topic belirtilir.

Topic İçin Index Numarası
Açıklaması şöyle
But these topics are created with a default naming standard. They are created as javaMethodName-in-<index> and javaMethodName-out-<index> where index corresponds to the index of the application instance. So, when this app is run in local, the Exchanges will get created as convertToUppercase-in-0 and convertToUppercase-out-0. But the Producer microservice publishes the event to an Exchange named as values-topic. So, unless we override the default Exchange names created by Spring, the message sent by Producer will not be read by Processor as they’ll be sending and listening to different Exchanges.
Örnek
Şöyle yaparız
spring:
cloud: function: definition: consumer;producer stream: bindings: producer-out-0: destination : first-topic consumer-in-0: destination : first-topic
Örnek
application.yaml şöyledir. processbean-in-0 ve processbean-out-0 başlıkları altında okunacak ve yazılacak topic isimleri belirtilir.
server:
  port: 9001

spring:
  cloud:
    stream:
      function:
        definition: fizzBuzzProducer;fizzBuzzProcessor;fizzBuzzConsumer

      bindings:
        fizzBuzzProducer-out-0:
          destination: numbers
        fizzBuzzProcessor-in-0:
          destination: numbers
        fizzBuzzProcessor-out-0:
          destination: fizz-buzz
        fizzBuzzConsumer-in-0:
          destination: fizz-buzz
      kafka:
        binder:
          brokers: localhost:9092
          auto-create-topics: true
Processor girdi ve çıktı olarak Flux kullanan bir Function döndürür. Şöyle yaparız
@Bean
public Function<Flux<Integer>, Flux<String>> fizzBuzzProcessor(){
  return longFlux -> longFlux
.map(i -> evaluateFizzBuzz(i))
.log();
}

String evaluateFizzBuzz(Integer value) {
  if (value % 15 == 0) {
    return "FizzBuzz";
  } else if (value % 5 == 0) {
    return "Buzz";
  } else if (value % 3 == 0) {
    return "Fizz";
  } else {
    return String.valueOf(value);
  }
}
Örnek
application.properties şöyledir
spring:
cloud: stream: bindings: convertToUppercase-in-0: destination: values-topic group: processor convertToUppercase-out-0: destination: uppercase-values-topic
Şöyle yaparız
import lombok.extern.slf4j.Slf4j;
import org.springframework.context.annotation.Bean; import org.springframework.stereotype.Component; import java.util.function.Function; @Slf4j @Component public class ValueProcessor { @Bean public Function<String, String> convertToUppercase() { return (value) -> { log.info("Received {}", value); String upperCaseValue = value.toUpperCase(); log.info("Sending {}", upperCaseValue); return upperCaseValue; }; } }
Örnek
Şöyle yaparız. Burada enrichAndSendToRabbit isimli bean Kafka'daki product-topic isimli kuyruğu okur ve Rabbit'teki inventory.message.exchange isimili exchange'e yazar. Bu exchange için kullanılacak routing key değerleri de aşağıda belirtiliyor.
spring:
  cloud:
    stream:
      bindings:
        enrichAndSendToRabbit-in-0:
          destination: product-topic
          binder: kafka
          group: product-enrich-group
        enrichAndSendToRabbit-out-0:
          destination: inventory.message.exchange
          requiredGroups: inventory_group
          binder: rabbit
      rabbit:
        bindings:
          enrichAndSendToRabbit-out-0:
            producer:
              bindingRoutingKey: inventory_item_publication
              routing-key-expression: "'inventory_item_publication'"
              exchangeAutoDelete: false
              exchangeType: direct
Açıklaması şöyle
We have to bind both the input and the output streams to the corresponding channels. We already know how we can bind Kafka channels. RabbitMQ is similar, but brings in some special binding properties like the type of the exchange and the routing key. With the direct type the consumers will use the routing key to redirect the message from the given exchange towards the queue declared by the consumer. It is very useful in case of point-to-point communication.
Örnek
Şöyle yaparız. Rabbit üzerindeki inventory.message.exchange ve Kafka üzerindeki product-topic kuyruklarını okur
spring:
  cloud:
    stream:
      bindings:
        multiInMultiOut-in-0:
          group: multi_message_group
          destination: inventory.message.exchange
          binder: rabbit
        multiInMultiOut-in-1:
          destination: product-topic
          binder: kafka
          group: product-multimessage-group
        multiInMultiOut-out-0:
          destination: multi-name-topic
        multiInMultiOut-out-1:
          destination: multi-quantity-topic
      rabbit:
        bindings:
          multiInMultiOut-in-0:
            consumer:
              bindingRoutingKey: inventory_item_publication
              exchangeType: direct
Örnek
application.yml dosyası şöyle olsun
spring.cloud.stream:
  function:
    definition: orderSupplier;orderProcessor
  bindings:
    orderSupplier-out-0:
      destination: order-received
      producer:
        useNativeEncoding: true
    orderProcessor-in-0:
      destination: order-received
    orderProcessor-out-0:
      destination: order-validated
  kafka:
    bindings:
      orderSupplier-out-0:
        producer:
          configuration:
            key.serializer: org.apache.kafka.common.serialization.StringSerializer
            value.serializer: io.confluent.kafka.serializers.KafkaAvroSerializer
            schema.registry.url: http://localhost:8081
    streams:
      binder:
        applicationId: kafka-cqrs-command-processor
        configuration:
          schema.registry.url: http://localhost:8081
          commit.interval.ms: 100
          default:
            key.serde: org.apache.kafka.common.serialization.Serdes$StringSerde
            value.serde: io.confluent.kafka.streams.serdes.avro.SpecificAvroSerde

server.port: 9001
Şöyle yaparız
import org.apache.kafka.streams.kstream.KStream;
import org.springframework.context.annotation.Bean;
import org.springframework.stereotype.Component;

import java.util.function.Function;

@Component
public class CommandProcessor {
  @Bean
  public Function<KStream<String, ReceivedOrder>, KStream<String, ValidatedOrder>>
orderProcessor() {
return receivedOrdersStream -> receivedOrdersStream .mapValues(ProcessorUtil::validateOrder); } }
Örnek
application.yml dosyası şöyle olsun
spring.cloud.stream:
function: definition: itemProcessor # Processors bindings: # green itemProcessor-in-0: destination: order-validated itemProcessor-out-0: destination: cheap-item-ordered itemProcessor-out-1: destination: affordable-item-ordered itemProcessor-out-2: destination: expensive-item-ordered kafka: streams: binder: applicationId: kafka-cqrs-query-processor configuration: schema.registry.url: http://localhost:8081 commit.interval.ms: 100 default: key.serde: org.apache.kafka.common.serialization.Serdes$StringSerde value.serde: io.confluent.kafka.streams.serdes.avro.SpecificAvroSerde server.port: 9002
Processor için aggregation işlemi yapan kod şöyle olsun
import org.apache.kafka.streams.KeyValue;
import org.mapstruct.factory.Mappers;

public class ProcessorUtil {
  
  public static KeyValue<String, OrderedItem> getItem(String customerId,
ValidatedOrder validatedOrder) { return new KeyValue<>(customerId, Mappers.getMapper(QueryMapper.class).getOrderedItemMessage(validatedOrder)); } public static OrderedItemsList initializeItems() { return OrderedItemsList.newBuilder().setItems(new ArrayList<>()).build(); } public static OrderedItemsList aggregateItems(String aggKey, OrderedItem newValue,
OrderedItemsList aggValue) { int index = aggValue.getItems().indexOf(newValue); if (index >= 0) { int quantity = aggValue.getItems().get(index).getQuantity(); aggValue.getItems().get(index).setQuantity(quantity + 1); } else { aggValue.getItems().add(newValue); } return aggValue; } }
Şöyle yaparız. Burada aggregation sonucu KTable nesnelerine yazılır.
import org.apache.kafka.streams.kstream.KStream;
import org.apache.kafka.streams.kstream.Materialized;
import org.apache.kafka.streams.kstream.Predicate;

@Component
public class QueryProcessor {
  public static final String ITEM_STORE_SUFFIX = "-items-store";

  Predicate<String, OrderedItem> isItemCheap = (k, v) -> v.getPrice() < 5;
  Predicate<String, OrderedItem> isItemAffordable = (k, v) -> v.getPrice() >= 5 && v.getPrice() < 50;
  Predicate<String, OrderedItem> isItemExpensive = (k, v) -> v.getPrice() > 50;

  @Bean
  public Function<KStream<String, ValidatedOrder>, KStream<String, OrderedItem>[]> itemProcessor() {
    return validatedOrdersStream -> {
      // group the ordered items by price
      KStream<String, OrderedItem>[] orderedItemsByPriceStream = validatedOrdersStream
        .map(ProcessorUtil::getItem)
        .branch(isItemCheap, isItemAffordable, isItemExpensive);

      // materialize the groups items into separate state stores.
      // Cheap items:
      orderedItemsByPriceStream[0].groupByKey().aggregate(
        ProcessorUtil::initializeItems,
        ProcessorUtil::aggregateItems,
        Materialized.as(Price.CHEAP.label + ITEM_STORE_SUFFIX));
      // Affordable items:
      orderedItemsByPriceStream[1].groupByKey().aggregate(
        ProcessorUtil::initializeItems,
        ProcessorUtil::aggregateItems,
        Materialized.as(Price.AFFORDABLE.label + ITEM_STORE_SUFFIX));
      // Expensive items:
      orderedItemsByPriceStream[2].groupByKey().aggregate(
        ProcessorUtil::initializeItems,
        ProcessorUtil::aggregateItems,
        Materialized.as(Price.EXPENSIVE.label + ITEM_STORE_SUFFIX));

      return orderedItemsByPriceStream;
  };
}


SpringCloud Stream Producer Bean

Giriş
Producer Bean için sadece "foo-out-0" şeklinde bir topic vermek yeterli.

Örnek
Şöyle yaparız. Burada iki tane bean ismi belirtilmiş.
spring:
  cloud:
    stream:
      function:
        definition: consumeMessage;produceMessage
Producer Bean Supplier arayüzünü gerçekleştirirler. Bir Sink'e yazarlar. Producer'ın yazdığı topic'i belirtmek için şöyle yaparız. produceMessage isimli bean Kafka üzerindeki product-topic isimli kuyruğa yazacak
spring:
  cloud:
    stream:
      bindings:
        produceMessage-out-0:
          destination: product-topic
          binder: kafka
Örnek
StreamBridge ile  yazma yapılabilir.

Örnek - Reactor Sink
Elimizde şöyle bir application.yaml olsun. orderSupplier bean, order-event kuyruğuna yazar.
server:
  port: 8080
spring.cloud.stream:
  function:
    definition: orderSupplier;paymentEventConsumer;inventoryEventConsumer
  bindings:
    orderSupplier-out-0:
      destination: order-event
    paymentEventConsumer-in-0:
      destination: payment-event
    inventoryEventConsumer-in-0:
      destination: inventory-event
Kuyruğu işleyen taraf şöyledir. Processor order-event kuyruğundan okur ve payment-event kuyruğuna yazar.
spring.cloud.stream:
  function:
    definition: paymentProcessor
  bindings:
    paymentProcessor-in-0:
      destination: order-event
    paymentProcessor-out-0:
      destination: payment-event
Event gönderen tarafı şöyle yaparız. Sinks.Many Flux arayüzüne çevriliyor.
import reactor.core.publisher.Flux;
import reactor.core.publisher.Sinks;

import java.util.function.Supplier;

@Configuration
public class OrderConfig {

  @Bean
  public Sinks.Many<OrderEvent> orderSink(){
    return Sinks.many().unicast().onBackpressureBuffer();
  }

  @Bean
  public Supplier<Flux<OrderEvent>> orderSupplier(Sinks.Many<OrderEvent> sink){
    return sink::asFlux;
  }
}
Event gönderen tarafı kullanmak için şöyle yaparızBurada Sink için Sinks.Many kullanılıyor.
@Service
public class OrderStatusPublisher {

  @Autowired
  private Sinks.Many<OrderEvent> orderSink;

  public void raiseOrderEvent(...){
    ...
    OrderEvent orderEvent = ...;
    this.orderSink.tryEmitNext(orderEvent);
  }
}
Kullanmak için şöyle yaparız
@Service
public class OrderCommandService {
    
  @Autowired
  private OrderStatusPublisher publisher;

  @Transactional
  public PurchaseOrder createOrder(OrderRequestDto orderRequestDTO){
    PurchaseOrder purchaseOrder = ...;
    this.publisher.raiseOrderEvent(purchaseOrder, OrderStatus.ORDER_CREATED);
    return purchaseOrder;
  }
}
Örnek - Reactor EmitterProcessor
Elimizde şöyle bir application.yaml dosyası olsun
spring.cloud.stream:
  function:
    definition: orderSupplier;orderProcessor
  bindings:
    orderSupplier-out-0:
      destination: order-received
      producer:
        useNativeEncoding: true
    orderProcessor-in-0:
      destination: order-received
    orderProcessor-out-0:
      destination: order-validated
  kafka:
    bindings:
      orderSupplier-out-0:
        producer:
          configuration:
            key.serializer: org.apache.kafka.common.serialization.StringSerializer
            value.serializer: io.confluent.kafka.serializers.KafkaAvroSerializer
            schema.registry.url: http://localhost:8081
    streams:
      binder:
        applicationId: kafka-cqrs-command-processor
        configuration:
          schema.registry.url: http://localhost:8081
          commit.interval.ms: 100
          default:
            key.serde: org.apache.kafka.common.serialization.Serdes$StringSerde
            value.serde: io.confluent.kafka.streams.serdes.avro.SpecificAvroSerde

server.port: 9001
Şöyle yaparız. Burada Sink için EmitterProcessor.create() kullanılıyor.
import org.mapstruct.factory.Mappers;
import org.springframework.kafka.support.KafkaHeaders;
import org.springframework.messaging.Message;
import org.springframework.messaging.support.MessageBuilder;
import reactor.core.publisher.EmitterProcessor;
import reactor.core.publisher.Flux;

@RestController
public class CommandController {
  private final EmitterProcessor<Message<ReceivedOrder>> messageEmitterProcessor =
EmitterProcessor.create();

  @PostMapping(value = "/orders", consumes = MediaType.APPLICATION_JSON_VALUE)
  public ResponseEntity<Order> createOrder(@RequestBody Order order) {
    // initiate asynchronous processing of the order
    ReceivedOrder receivedOrderMessage = Mappers.getMapper(CommandMapper.class)
.getReceivedOrderMessage(order);
    messageEmitterProcessor.onNext(MessageBuilder.withPayload(receivedOrderMessage)
      .setHeader(KafkaHeaders.MESSAGE_KEY, receivedOrderMessage.getCustomerId()).build());

    // send back a response confirming the recipient of the order
    return ResponseEntity.status(HttpStatus.ACCEPTED).body(order);
  }

  @Bean
  public Supplier<Flux<Message<ReceivedOrder>>> orderSupplier() {
    return () -> messageEmitterProcessor;
  }
}

SpringCloud Stream InteractiveQueryService Sınıfı

Giriş
Şu satırı dahil ederiz
import org.springframework.cloud.stream.binder.kafka.streams.InteractiveQueryService;
getQueryableStore metodu
KTable nesnesinin sorgulanmasını sağlar.

Örnek
Şöyle yaparız
@RestController
import org.apache.kafka.streams.state.ReadOnlyKeyValueStore;
import org.springframework.cloud.stream.binder.kafka.streams.InteractiveQueryService;

public class QueryController {
  @Autowired
  private InteractiveQueryService queryService;

  @GetMapping(value = "/orders", produces = MediaType.APPLICATION_JSON_VALUE)
  public ResponseEntity<List<Item>> getItemsByCustomerIdAndPrice(
@RequestParam(value = "customerId") String customerId, 
    @RequestParam(value = "price") Price price) {

    // get the item store for the given colour
    String storeName = ...;
    ReadOnlyKeyValueStore<String, OrderedItemsList> orderedItemsStore = queryServicea
.getQueryableStore(storeName,QueryableStoreTypes.keyValueStore());

    // get the items for the given customer
    OrderedItemsList orderedItems = orderedItemsStore.get(customerId);
    if (orderedItems != null) {
      List<Item> response = Mappers.getMapper(QueryMapper.class).getItems(orderedItems
.getItems());
      return ResponseEntity.ok(response);
    } else {
      return ResponseEntity.notFound().build();
    }
  }
}