22 Haziran 2021 Salı

SpringBoot Test @AutoConfigureTestDatabase Anotasyonu

Giriş
Şu satırı dahil ederiz
import org.springframework.boot.test.autoconfigure.jdbc.AutoConfigureTestDatabase;
Not : Bu anotasyon yerine test için @DataJpaTest tercih edilebilir.

replace Alanı
Testlerin bellekteki bir veri tabanı yerine gerçek veri tabanında koşmasını sağlar. Açıklaması şöyle
In-memory embedded databases generally work well for tests since they are fast and don’t require any developer installation. If, however, you prefer to run tests against a real database you can use the @AutoConfigureTestDatabase annotation
Örnek
Şöyle yaparız
@DataJpaTest
@AutoConfigureTestDatabase(replace=Replace.NONE)
Örnek
Eğer veri tabanını bellekte değil de TestContainers içinde istersek şöyle yaparız
@DataJpaTest
@Testcontainers
@ActiveProfiles("test-containers")
@AutoConfigureTestDatabase(replace = Replace.NONE)
class PersonRepositoryTestContainers {

  @Autowired
  private PersonRepository personRepository;

  @Test
  void shouldReturnAlLastNames() {
    personRepository.saveAndFlush(new Person().setFirstName("John").setLastName("Brown"));
    personRepository.saveAndFlush(new Person().setFirstName("Kyle").setLastName("Green"));
    personRepository.saveAndFlush(new Person().setFirstName("Paul").setLastName("Brown"));

    assertEquals(Set.of("Brown", "Green"), personRepository.findAllLastNames());
  }
}
Açıklaması şöyle
@DataJpaTest is annotated with @AutoConfigureTestDatabase itself. This annotation replaces any data source with the H2 instance by default. So, we need to override this behavior by adding replace=Replace.NONE property.
Yani aslında şöyle yapmanın bir anlamı yok
@DataJpaTest
@AutoConfigureTestDatabase(replace=Replace.NONE,
                           connection = EmbeddedDatabaseConnection.H2)
15 Haziran 2021 Salı

SpringSecurity InMemoryUserDetailsManager Sınıfı - Default UserDetailsManager Sınıfı Budur

Giriş
Şu satırı dahil ederiz
import org.springframework.security.provisioning.InMemoryUserDetailsManager;
Bu sınıf HttpBasic Authentication kullanılıyorsa tercih edilebilir.

constructor
Şöyle yaparız
@Bean
public InMemoryUserDetailsManager inMemoryUserDetailsManager() { UserDetails admin = User.builder() .username("gurkan") .password(passwordEncoder.encode("pass")) .authorities("ADMIN") .build(); UserDetails user = User.builder() .username("mehmet") .password(passwordEncoder.encode("pass")) .authorities("USER") .build(); return new InMemoryUserDetailsManager(admin, user); }
createUser metodu
Örnek
Şöyle yaparız
@Configuration
public class SecurityConfiguration extends WebSecurityConfigurerAdapter {

  @Override
  protected void configure(HttpSecurity http) throws Exception {
    http.authorizeRequests().anyRequest().authenticated().and().httpBasic();
  }

  @Override
  @Bean
  protected UserDetailsService userDetailsService() {
    InMemoryUserDetailsManager inMemoryUserDetailsManager =
new InMemoryUserDetailsManager();

    UserDetails user1 = User.builder().username("user").password("password")
.roles("USER").build();
    UserDetails user2 = User.builder().username("admin").password("password")
.roles("ADMIN").build();

    inMemoryUserDetailsManager.createUser(user1);
    inMemoryUserDetailsManager.createUser(user2);

    return inMemoryUserDetailsManager;
  }

  @Bean
  public PasswordEncoder passwordEncoder() {
   return NoOpPasswordEncoder.getInstance();
  }
}

8 Haziran 2021 Salı

SpringData ElasticSearch Kullanımı

Maven
Şu satırı dahil ederiz
<dependency>
  <groupId>org.springframework.boot</groupId>
  <artifactId>spring-boot-starter-data-elasticsearch</artifactId>
</dependency>
Kavramlar
Index : ilişkisel veri tabanındaki DB anlamına gelir
Type : ilişkisel veri tabanındaki Table anlamına gelir
Document : ilişkisel veri tabanındaki Row anlamına gelir
Field : ilişkisel veri tabanındaki Column anlamına gelir

Açıklaması şöyle
There are two ways to do operations on elastic search using spring boot.
1. By using ElasticsearchRestTemplate: This we should use when we want to create more complex queries.
2. By Using Repositories: This is very simple and it has all the methods defined and internally it creates elastic-based queries.
application.properties
Açıklaması şöyle
By default, application tries to connect with Elasticsearch on localhost. If we use another target URL we need to override it in configuration settings. 
ElasticsearchOperations ile işlem yapılabilir
ElasticsearchRepository kullanılabilir

Örnek
Şöyle yaparız
spring: data: elasticsearch: cluster-name: docker-cluster # Comma-separated cluster node addresses. If not specified, starts a client node. cluster-nodes: localhost:9200 # Enable Elasticsearch repositories. repositories: enabled: true rest: uris: http://localhost:9200
ElasticsearchConfiguration Sınıfı
Örnek
Şöyle yaparız
@Configuration public class ElasticsearchClientConfig extends ElasticsearchConfiguration { @Value("${spring.elasticsearch.rest.uris}") String connetionUrl; @Override public ClientConfiguration clientConfiguration() { return ClientConfiguration.builder() .connectedTo(connetionUrl) .build(); } }
AbstractElasticsearchConfiguration  Sınıfı
Eğer ElasticsearchRestTemplate kullanacaksak şu açıklamayı bilmek lazım. Açıklaması şöyle
ElasticSearchRestTemplate is built on the top of RestHighLevelClient. You can think of it as a Spring wrapper over RestHighLevelClient.
Örnek
Şöyle yaparız
import org.elasticsearch.client.RestHighLevelClient; import org.springframework.data.elasticsearch.client.ClientConfiguration; import org.springframework.data.elasticsearch.client.RestClients; import org.springframework.data.elasticsearch.config.AbstractElasticsearchConfiguration; import org.springframework.data.elasticsearch.repository.config. EnableElasticsearchRepositories; @Configuration @EnableElasticsearchRepositories(basePackages = "com.search.elasticsearchapp.repo") @ComponentScan(basePackages = { "com.search.elasticsearchapp" }) public class ElasticsearchClientConfig extends AbstractElasticsearchConfiguration { @Override @Bean public RestHighLevelClient elasticsearchClient() { ClientConfiguration clientConfiguration = ClientConfiguration .builder() .connectedTo("localhost:9200") .build(); return RestClients.create(clientConfiguration).rest(); } }
Daha sonra bir nesne yaratırız
import org.springframework.data.annotation.Id; import org.springframework.data.elasticsearch.annotations.Document; import org.springframework.data.elasticsearch.annotations.Field; import org.springframework.data.elasticsearch.annotations.FieldType; @Document(indexName = "product") public class Product { @Id private String id; @Field(type = FieldType.Text, name = "name") private String name; @Field(type = FieldType.Double, name = "price") private Double price; @Field(type = FieldType.Text, name = "creator") private String creator; }
Daha sonra repository için şöyle yaparız. Repository sınıfı save() vs gibi metodlar sağlıyor ancak kendi metodlarımızı da yazmak gerekebilir.
import com.search.elasticsearchapp.model.Product; import org.springframework.data.elasticsearch.repository.ElasticsearchRepository; import org.springframework.stereotype.Repository; @Repository public interface ProductRepo extends ElasticsearchRepository<Product, Long> { List<Product> findByName(String name); List<Product> findByNameContaining(String name); List<Product> findByCreatorAndName(String creator, String name); }
RestHighLevelClient Sınıfı
RestHighLevelClient Sınıfı yazısına taşıdım

4 Haziran 2021 Cuma

SpringSecurity FilterChainProxy Sınıfı

Giriş
Şu satırı dahil ederiz
import org.springframework.security.web.FilterChainProxy;
Açıklaması şöyle 
FilterChainProxy — This is another layer of indirection provided by Spring security. This is also a servlet filter whose job is to invoke the relevant filters that would work on the incoming request. Like the DelegatingFilterProxy, it also does not perform any logic. This filter is however provided by the Spring security package. 

SecurityFilter(s) — This is the most interesting bit in the above chain. This class basically contains a list of actual filters that need to be invoked before the controller can handle the request. It contains filters for example — SecurityContextPersistenceFilter, HeaderWriterFilter, CsrfFilter, LogoutFilter, UsernamePasswordAuthenticationFilter etc. when one uses the default security config. FilterChainProxy queries this class to invoke each filter in a loop. 

 There can be multiple SecurityFilterChain, each having its own stack of filters which could be the same or different from the other SecurityFilterChain.
Filtreler Nasıl Yaratılırlar?
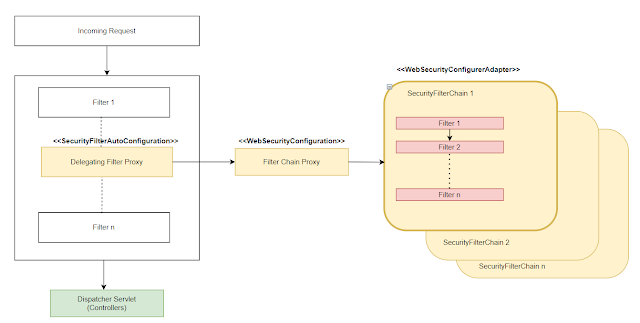
Şeklen şöyle. Yani istek servlet'e gelmeden önce bir dizi Filter'dan geçer. Her bir Filter ise kendi içinde bir başka zincire sahiptir.

Bu filter'lardan bir tanesi DelegatingFilterProxy. DelegatingFilterProxy ise bu yazıda anlatılan FilterChainProxy sınıfını çağırıyor.
Şeklen şöyle


Açıklaması şöyle
The text in bold — SecurityFilterAutoConfiguration, WebSecurityConfiguration and WebSecurityConfigurerAdapter are the java class names that are responsible for the creation of DelegatingFilterProxy, FilterChainProxy and SecurityFilterChain respectively.

The boxes colored yellow/red are the components that are used in the security filtering part of the request.

The box in green — DispatcherServlet is called once the request is validated by the filter chain.
SecurityFilterChain içindeki akış şeklen şöyle


SpringSecurity SecurityFilterChain Nasıl Oluşturulur

Giriş
SecurityFilterChain zinciri FilterChainProxy içindedir. Şeklen şöyle. DelegatingFilterProxy, FilterChainProxy sınıflarına bakabilirsiniz.